Language
only works when Language is set to English.
Display

in Display Settings, set "Windowed or Fullscreen" to "Window mode" or "fixed Window" as shown in Screenshot above.
Enable Info Panels
Enable the Info Panels "System Info", "Route", "Agent Missions", and the one that show you Incursions.
Window Arrangement
The following Windows will be left open by the application all the time:
- Overview
- Selected Item
- Drones
- Station Services
Arrange the aforementoined Windows so that the following conditions are met:
- None of those Windows covers a part of another Window in this Group
- None of those Windows covers a part of either Info Panels, Targets, Ship Control Panel or Neocom Panel
Ship Control Panel


Ship Control Panel has to be configured as follows (also shown in two Screenshots above):
- Display Passive Modules: off
- Display Empty Slots: off
- Display Readout: on
- Display Module Tooltips: on
- group Weapons
Window "Inventory"

The Window which contains the Inventory has to be set up as follows (as shown in the Screenshots above):
- all Filters deactivated
- Panel "My filters" collapsed (its contents invisible)
- at the upper right View type "List" is choosen to display the Items in the Inventory are displayed in a List.
- the Three View on the left is expanded.
- in the Menu which is accessed by the Button in the upper left (left of the "Index" Label) the checkboxes are set as follows:
- "Always open in seperate Window": off
- "Keep filter value between inventories": on
- "Always show full tree": on
Window "Station Services"
- the tab labeled "Agents" must be selected.
- all Agents must be visible without scrolling.
Window "Fitting Management"

All Fittings that are configured to be used must be visible without scrolling or expanding the branches containing them.
Window "Overview"

The Columns "Icon", "Distance", "Name" and "Type" have to be enabled as shown in Screenshot above.
The Overview must be sorted by Distance in ascending Order (with the nearest Object at the Top).
Window "Drones"
The Folders "Drones in bay" and "Drones in local space" have to be visible without scrolling.
usually, the Application will be distributed in a Zip-Archive containing two executables and some other stuff.
The executable of main interest is named "Optimat.EveOnline.Knsl.exe". This one is used to configure the behaviour in game, connect to the game, generate Input, etc.
If configured accordingly, it will also write Reports containing Info about the games state to files.
The other executable named "Optimat.EveOnline.Session Report.exe" can be used to load and examine Reports from files to provide insights into what exactly happend in a past Session.
Eve Online.Preferences
In this section, the preferred behaviour in Eve Online is configured. Decisions in the Game will be made according to the Inputs made in this section.
storing and loading Preferences

in the section "store / load / reset Preferences" in the Tab "Eve Online" -> "Preferences" (shown in the Screenshot above) all the settings from the Tab "Eve Online" -> "Preferences" can be stored to file by using the button "store to file".
When the Button "store to file" is clicked, the Application will try to write the Preferences to the default Location from which they will be automatically loaded when the Application starts.
When a File is dragged from Windows Explorer and dropped on the Button "store to file", the Application will try to write the Preferences to that file.
The Button "load from file" is used similarly: When clicked, it tries to load from the default location. When a file is dropped it tries to load from that file.
After initiating a store or load operation, a message will displayed in the section labeled "result" (also shown in Screenshot above). This Message contains the path to the involved file and whether the operation was successful or failed.
Start Eve Online and Log in to your account. After that, start the Bot.
When the Application starts, it will load the settings last stored in the "Settings" Tab and the Settings last stored in the "Eve Online" Tab under "load / store / reset Preferences".
Optimization Service
The Application will attempt to contact a Server referred to as "Optimization Service". This Service allows the Application to make sense of the Data it reads from the Eve Online Process.
If this Connection has been successfully established, the Status Indication in the "Optimization Service" Tab Heading is green.
The Application will need up to fifteen seconds to establish the Connection.
connection to Eve Online Process
With default settings in place, the Application should automatically identify the Eve Online Process and begin reading from the Eve Online Process. Usually this will take less then 15 seconds. Successful reading from the Eve Online Process will be indicated by the status display in the Tab "Target Process" -> "reading from Process" turning to green (as in the Screenshot below).

starting and stopping the Bot

switch to the Tab "Target Process" -> "input to Process". There you will be presented with a list of keyboard shortcuts that can be used to pause generating input (as shown in Screenshot above).
Remember one of the listed Shortcuts as you may need it to pause generating input. To pause generating Input you might as well use the Button labeled "pause" in the "Target Process" Tab Heading.

to start generating input, click on the Button labeled "play" at the Top in the "Target Process" Heading.
Troubleshooting
In case the Bot exhibits unexpected Behaviour have a look at the Tab "Eve Online"->"UI & Config".
In this Tab Warning or Error Messages will be displayed if the Bot detects a Problem with the configuration.
The following screenshot gives an Example of how such a Message might look like:

Auto.Pilot
This Function enables fast and save travel
- follows the route given in the Info Panel "Route".
- uses the functions for direct Warp to next Jump Gate/Station to ensure shortest possible travel time.
- activates available Hardeners after every Jump.

To use this Function enable the Button in the Heading of the Tab "Eve Online"->"Preferences"->"Auto.Pilot" and start the Bot as shown in the Screenshot above.
AutoPilot does not Undock. please Undock manually when using AutoPilot.
Auto.Mission
Auto.Mission.Basics
This Section aims at preparing the Bot to execute a single Mission from Undocking to Docking.

This walkthrough is based on the default Settings. In case changes have been made to the Bot Preferences before, they need to be reset to Default by clicking the Button "reset to default" in Section "store / load / reset Preferences".
Identifying supported Missions

As of now, the Bot only supports Missions which ask for destruction and looting from containers or Wrecks.
The Bot does not yet support Missions which require any of the following actions:
- changing the Ship
- mining
- placing Items in Containers or Wrecks in Space
Whether the Bot supports a given Mission can be determined by looking at the Table in Tab "Eve Online"->"Preferences"->"Auto.Mission" in Section "settings dependend on mission type":
All Missions which are supported have an entry in this table with a green Background in the Column "execute mission".
detection of Missions by the Bot
Following conditions must be met at the same time to ensure that the Bot notices a Mission:
- Char is docked in the Agents Station
- The Agents Dialogue Window is open
When the Missions Info Panel contains a Mission, the Bot will open the Dialogue with the Agent from there.

All Missions the Bot has detected and not yet ended are listed in Tab "Eve Online"->"Missions".
For proper detection the Missions entry has to contain the Title and the Name of the Agent.
The Screenshot above shows an example of a Mission detected by the Bot.
letting the Bot execute a Mission

follow these steps to let the Bot execute a Mission it has successfully detected (as shown in Screenshot above):
- manually accept the Mission in Eve Online Client.
- manually prepare Ship (Ammo, Drones, ....)
-
in the Bot UI in the Tab "Eve Online"->"Preferences"->"Auto.Mission"
- in Section "settings for all Missions" set the checkmark for the particular Agent Level.
- in the Table in Section "settings dependend on mission type" in the Entry for the Mission set the checkmark in the column "execute mission".
- enable the Button in the Heading of the Tab "Eve Online"->"Preferences"->"Auto.Mission" and start the Bot.
Since no Fittings where configured the Bot will make no changes to the Ship and Undock directly.

In the Tab "Eve Online"->"UI & Config" a Warning Message will be displayed because the current Mission has no Fitting configured.
In this case this Warning Message can be ignored because the Ship was prepared manually.

Auto.Mission.Details
This Section is aimed at users who successfully applied Section "Auto.Mission.Basics" to let the Bot execute a single Mission automatically.
This Section explains how to prepare the Bot to execute multiple Missions in a row.
This includes:
- preparing the Ship for the Mission.
- accepting and declining Missions.
- searching Stations for Mission Offers.
preparing the Ship for the Mission
As long as the Preferences contain no Fitting instructions, the Bot will enter the Mission without changes to the Ship.
The current Version of the Bot allows the preparation of the Ship by loading a Fitting from the "Fitting Management". Ammo and Drones have to be included in that Fitting.
The Bot only detects the successfull loading of a Fitting if the Eve Online Client displays the Message shown in the Screenhot below:

This Message is only displayed if the Fitting contains at least one Rig.
When the Bot detects a Mission, it tries to determine the Faction of the NPC it will encounter in that Mission.
The Bot only accepts Missions it can determine the Faction for.

In Tab "Eve Online"->"Preferences"->"Fitting" each Faction can be assigned a Fitting (Screenshot above)
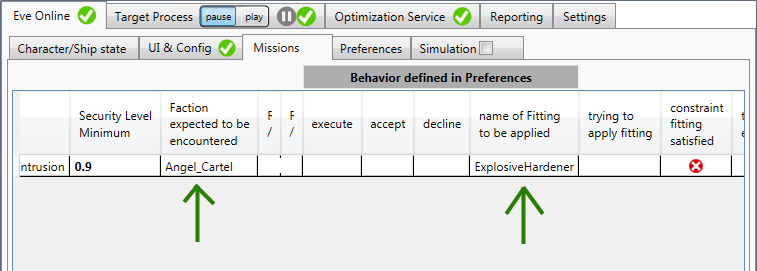
In Tab "Eve Online"->"Mission" the Bot shows (as in Screenshot above):
- Column "Faction expected to be encountered": the Faction detected for the Mission.
- Column "name of Fitting to be applied": the Fitting to be applied to prepare the Ship for the Mission.
- Column "constraint fitting satisfied": whether the Bot has successfully applied the Fitting.
accepting and declining Missions

Meaning of the Options in Tab "Eve Online"->"Preferences"->"Auto.Mission" shown in the Screenshot above:
- "accept Missions enabled": accept Missions enabled.
- "decline Missions enabled": decline Missions enabled.
- "decline Missions ignoring standing loss enabled": for declining a Mission the Bot does not wait until this is possible without a loss of Standing.
- "decline Mission Offer if it does not fit any pattern to be accepted": any Missions which fit no pattern to be accepted will be declined.

In Tab "Eve Online"->"Mission" the result of the Preferences are shown for each Mission (as shown in Screenshot above):
- Column "execute": the Bot executes this Mission when no other Missions are available.
- Column "accept": the Bot accepts this Mission when no other Missions are available.
- Column "decline": the Bot declines this Mission.
searching Stations for Mission Offers

In the Section "stations to search for Agents" shown in the Screenshot above, the Application can be configured to enter different Stations to search for Agents which offer Missions.
The Bot will look for Mission offers matching the criteria defined above in the current Station. If none of the offers from Agents in the current Station is suitable, the Bot will leave the current Station and dock at the next Station in this list which has the Checkbox in the Column "active" ticked.
To add a Station to the list, enter that Stations Name in the Textbox in the Subgroup "insert Station" and click the button "insert now". The Station will then appear in the list.
To enable searching a Station from the list, tick the checkbox in the column "active".
The names of all Stations the Eve Online Char was docked to during the current connection to the Optimization Service are listed in the ComboBox that is used to enter the Stations name.